


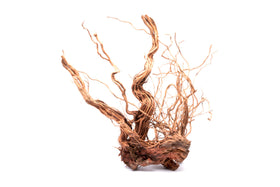

How To Clean Driftwood Before Adding It to Your Tank
A great piece of driftwood can change an entire aquascape. One branch creates height while a chunky stump gives plants and shrimp a natural place to settle. Before any of that happens, your new hardscape needs a little prep.
The process starts long before you place the wood between your plants. Good prep removes loose debris and lets tannins leach out of the aquarium. Keep reading to learn how to clean driftwood before adding it to your tank!
Choose Safe Wood Before You Clean

Malaysian driftwood is one of the most popular choices for aquascaping because it is a durable hardwood! As a general rule, hardwoods are safe for aquariums because they resist decay underwater, unlike softwoods that rot and leach sap.
Whenever possible, start with driftwood sold for aquarium use. Aquarium-safe wood is a better starting point because you know the piece was selected with aquatic setups in mind. Natural wood still needs cleaning before placement, however, as dust often settles into grooves during storage or shipping.
If you found wood you like outside, proceed with more caution. You need to know the type of wood and where the piece came from before placing anything from outdoors into an aquarium. Wood exposed to pesticides or other chemicals does not belong in your tank! Sap-filled wood should also be avoided.
For newer hobbyists, aquarium driftwood keeps the process much simpler. You get the natural character without guessing the piece's history. Then you can focus on the fun part: figuring out where the wood belongs in your layout.
Rinse Away Dust and Loose Debris
Rinse the driftwood thoroughly before you do anything else. Run clean water over every side of the piece and pay extra attention to deep grooves because debris likes to hide there. Turn the wood several times while you rinse.
The water should reach the underside and any small cavities in the piece. You do not need cleaning products for this step. Fresh water does the job! A strong rinse removes the easy stuff before you move on to scrubbing or soaking.

With its deep grooves and intricate pockets, Dragon Wood is a prime candidate for a rigorous rinse to remove hidden dust and debris before soaking.
Set Aside a Few Simple Supplies
Keep your driftwood tools separate from household cleaning supplies. Keep anything with soap residue away from the aquarium.
- A clean bucket or storage tub
- A new stiff-bristled brush
- A large pot if the wood fits safely
- Clean water for rinsing and soaking
- A rock or aquarium-safe weight for buoyant pieces
Having everything nearby makes the process much smoother. You also avoid grabbing a kitchen sponge that has already touched detergent. (We’ve all been there!)
Scrub the Surface and Tight Crevices
Now give the wood a proper scrub. Use a clean stiff-bristled brush and work across the grain. Focus on soft debris or dirt that stayed behind after rinsing.
Do not worry about making the wood look polished. Driftwood looks good because of its rough texture. Your goal is to clean the surface without grinding away the natural details that made you choose the piece in the first place.
After scrubbing, rinse the whole piece again and check your work.
Boil Driftwood if the Piece Fits
If your driftwood fits safely inside a large pot, boiling gives you a useful shortcut. We recommend anywhere from one to two hours for many natural aquarium woods if you want to speed up tannin release. The hot soak also helps water work its way deeper into the wood.
Keep the piece submerged as much as possible! If one end sticks out of the water, rotate the wood during the process. This gives the whole piece time in the hot water.
You will often see the water darken as tannins leave the wood. Dump that water afterward. Do not pour the dark, boiling water into your aquarium!
Soak Larger Wood Until It Stays Down
Some aquarium driftwood sinks quickly. Other pieces float like they have somewhere else to be. Spiderwood and several branchy woods often need more time underwater before they stay put.
Place larger driftwood in a clean bucket or storage tub. Cover the piece with water and use a clean aquarium-safe weight when needed. If the wood still wants to float after soaking, you can simply secure the piece during the aquascape build.
Decide How Much Tannin Tint You Want

Two-toned Mopani wood is an extremely dense African hardwood that sinks quickly, but its dark, rich grain carries heavy concentrations of tannins that will tint aquarium water brown!
That warm tea-colored water coming from driftwood is not dirt. Tannins naturally leach from many woods. Some aquascapers love the look while others want clear water around bright green plants.
Neither preference is wrong! Your prep depends on the look you want. Boiling speeds up the initial tannin release. Soaking also pulls color from the wood more gradually.
Do not expect every piece to stop releasing tannins completely before entering the aquarium. Some wood continues releasing a small amount for quite a while. Regular water changes gradually reduce the tint.
If you love crystal-clear water, give the wood more prep time.
Keep Soap and Household Cleaners Away
This part is simple. Skip the soap.
Do not wash aquarium driftwood with dish detergent or household cleaning spray. Avoid brushes or buckets that previously held strong chemicals. Keep aquarium materials separate from your normal cleaning gear. Soap residue creates an unnecessary risk for fish and shrimp. Fresh water and physical scrubbing give you the safer route.
Do Not Panic Over White Biofilm
You did all the prep, and the driftwood looked perfect. Then a few days later, white fuzzy growth appears across the surface.
Welcome to one of the most common new-driftwood moments!
Fresh driftwood often develops a white biofilm after entering the aquarium. This growth is common and harmless. Shrimp and some other aquarium inhabitants often graze on the film.
You have a couple of easy options if you dislike the look. Leave the biofilm alone and let the aquarium work through the phase. Otherwise, you can also brush or siphon away loose growth during a water change.

Expect this harmless slime to peak around week two of submerging new driftwood. Unless it blankets surrounding delicate plants, let nature take its course!
Place Your Driftwood With Less Mess
Once your wood feels clean and waterlogged, take a moment before dropping the piece into the tank. Test the orientation outside the aquarium first. Turning a large branch around inside a planted setup gets messy fast.
Then step back and look at the whole layout. This is the fun payoff after all the rinsing and soaking! Clean driftwood gives plants a strong base while adding structure that changes as the aquascape grows around it.
Learning how to clean driftwood before adding it to your tank comes down to giving natural wood a little time before setup day. Rinse thoroughly and scrub away trapped debris. Just remember, skip the soap! Soon, your hardscape will look like the part of the aquascape everything else was built around.
Want a strong focal point for your hardscape? Buce Plant offers a bonsai tree for aquarium layouts that will bring your vision to life. Add moss or epiphytes to the branches, then watch the piece blend into the layout as your plants grow in! If you want a focal point that feels natural and fun to design around, explore our selection and find the right piece for your next aquascape.
Leave a comment