The Best Way to Plant Different Types of Aquatic Plants
Written by: Chris (@shrimpery)

For people who love to work with their hands, planting an aquarium is one of the most satisfying parts of setting up a new scape. While the mind typically jumps to an image of planting stem plants with stainless steel aquascaping pinsettes, that is only one of the methods involved in setting up a planted tank. Depending on the location of the plant in the layout (towards the back, at the very front, on driftwood), different techniques are more effective. Below is a quick overview of which of these techniques to use.
Mosses:
Mosses are unique among the plants we use in aquariums as they have no roots. Planting them can be easier or more difficult than other plants depending on what you are trying to accomplish. Mosses are generally well-suited for tanks with prominent hardscape. They can soften the lines of the scape and make everything look more natural when growing on rocks or driftwood.
My favorite way to plant moss is to wedge small pieces of it into naturally occurring nooks and crannies in my hardscape. It only takes a small amount of moss to grow, so a rough piece of wood or a rock with a textured surface can be easily colonized using this technique. This technique can be done at the onset of filling the tank, or via dry start (under high humidity) with a few weeks’ head start before filling the tank. While it looks extremely natural, one downside of this method is that it takes a significant amount of time for the moss to spread and cover the surface of the hardscape it’s affixed to.
An alternative, faster method is to tie large clumps of moss to wood or rocks using green cotton thread. The green cotton thread will soon become less visible as the moss fills in over it, and will eventually dissolve. While this method is faster, it looks much worse initially, and is poorly suited for large rocks or driftwood with lots of small branches, such as manzanita wood. It is really best suited for covering large, monolithic pieces of dark wood, such as horn wood.

Prepping Christmas Moss to be planted
Moss can also be grown directly on the substrate using pinsettes, wedging it into the base of where the substrate meets the hardscape (or even planted similar to a carpeting plant). Unfortunately, this method often leads to a “dirtier” appearance, as we are not necessarily used to seeing the delicate moss growing at “ground level.” When growing amongst other carpeting plants in my scapes, it has been mistaken for algae by other hobbyists.
Stems:
Stem plants are among the easiest plants to plant in any given tank, but are also the most frequently botched. A hallmark of a beginner scape is stem plants planted with a wide berth of one another, in the erroneous belief that they will “shade each other out.” In reality, it is best to plant them closely, with each stem only being a few cm from each other max. Using UNS pinsettes, I plant the stems with 2-3 nodes below the surface, so they are well anchored. After they have settled in and grown (typically after two weeks to a month), I trim the tips to encourage branching, and plant the trimmed cutting amongst the original stems. As previously mentioned, do not worry about overcrowding; with most commercial light fixtures, enough light will typically penetrate for the bottom stems to be OK, and they usually will not break down if there is adequate flow in the tank.

Planting Rotala using UNS Pinsettes
Epiphytes:
A true epiphytic plant uses its roots for grasping onto supporting structures and gets its nutrition from the water column itself (Bucephalandra, Anubias, Java Fern). Thus rule #1 of planting epiphytes: do not bury the rhizomes! Most epiphytes will experience root rot if the rhizomes are not exposed to the water column, to the detriment of plant health.
Much like mosses, my favorite way to plant epiphytes is to wedge them into natural crevices in my hardscape (using a pair of UNS pinsettes, I gently grip them at their crown and wedge them in wherever I can). If there is a place you’d like to plant an epiphyte that lacks a crevice, you can elect to tie it in place using the thread or string technique previously described, or you can even use a tiny amount of superglue (surprisingly, typically 100% safe for fish and shrimp). With that said, most places without crevices look like less of a natural location for epiphytes to grow.

Tying Anubias Nana Petite White to a rock
Carpeting plants:
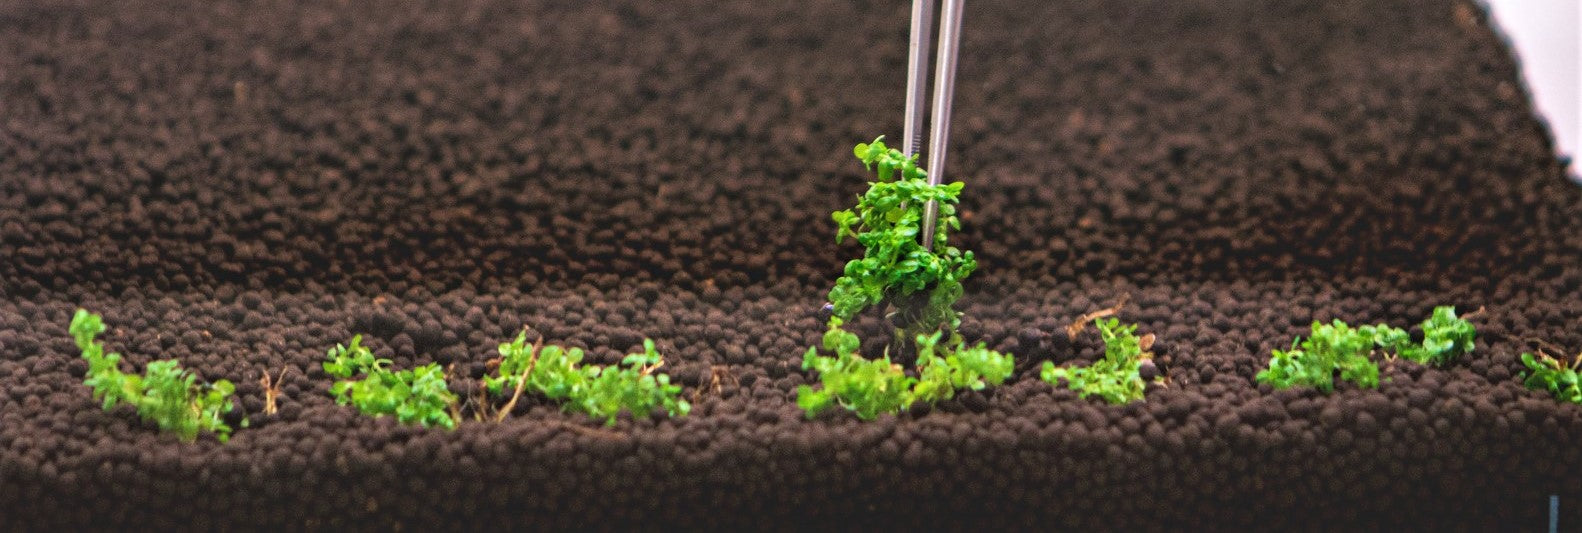
Similar to stem plants, don’t be afraid to plant carpeting plants densely from the start. The more plants you start out with, the faster your carpet will fill in. For best results, plant the carpet with tweezers prior to filling the tank. Don’t be afraid to plant them relatively deep into the substrate, such that most of the plant is buried with just a small amount of leaves visible poking through; this will ensure that the aquatic plants stay put.

Planting HC with UNS Pinsettes
Now that we’ve run through the different approaches to planting your scape, I wanted to emphasize some universal points. In general, it is best to plant heavy from the start. A big mistake that can doom beginners to failure is starting with a low biomass of plants; with less plants to compete for nutrients in a new, unbalanced environment, algae can thrive in this setting. This principle applies to carpeting plants, stem plants, and even moss. When prepping plants, bear in mind that plants grow best when you “break them up,” whether that means separating out individual tissue culture plantlets, or cutting long pre-grown stems into small, 2-3 node portions for planting. Finally, planting your plants deep into a moist substrate will ensure that less float to the surface upon filling the tank.
Now that you have a framework for how to think about the different ways to plant your scape, have fun with it! There are lots of ways to get creative when you set up a new scape, and planting is just one of them.

Tell us - Was this article helpful? Please leave a comment below!
If you have any questions regarding this article, please DM us on Instagram, Facebook, or email support@buceplant.com so we can assist you - @buceplant


Leave a comment