


Dry Start Method Step by Step Guide
Written by Bryson and Team Buce Plant
The initial weeks of starting a planted aquarium are often the most frustrating. You might experience plants that seem set on floating and sparse growth.
Let me introduce you to the dry start method (DSM). This bad boy solution gives you the opportunity to bypass all of the aforementioned problems! The dry start method simply allows your plants to grow quicker while emersed until their roots are established. It is also the easiest and quickest way to grow carpet plants. The DSM gives your plants more abundant access to the CO2 in the air as opposed to when they're submerged underwater (even with CO2 injection!)
First, here is a quick overview of how to perform a dry start for your planted aquarium. Then, a few tips to make sure your dry start is a successful one. Lastly, a photo series of my most recent dry start!
How to Dry Start a Planted Tank
Choose Your Plants
When choosing your flora for your dry start, keep in mind that the DSM works best for carpeting aquatic plants such as Utriculata Graminifolia, Monte Carlo, Pearlweed, Eleocharis Belem, etc. Aquatic mosses are perfect for a dry start as well!
- Hint: Buce Plant advises against using large stem plants or epiphytes during your dry start. Simply wait until after you flood the tank to add these plants. Remember, this method is meant to help you gain quicker ground cover and help establish particular plants in your tank! During the DSM, carpeting plants that stay low enough to the bottom of your tank will thrive, while stems and/or epiphytes will be at risk for drying out or dying.

Pictured above: Monte Carlo
Also, keep in mind that there are some species of plants that can only live submerged (Vallisneria, Nymphaea, Hornwort, Anacharis, and Aponogeton to name a few). Make sure to read up on the plants you choose for your dry start. The dry start method will only favor aquascapers using plants that can grow emersed & submerged.
To begin the DSM, you will simply set up your planted aquarium as normal but do not flood the tank.
Part 1:
DSM Tank Setup
Buce Plant recommends using a high-quality soil substrate, such as UNS Controsoil or Aquario Neo Plant Soil, to yield the best results and the healthiest plants. Controsoil is high-quality and full of nutrients which is vital for the success of any planted aquarium. Sand can be used, but you won’t experience the same growth or plant health that you would when using soil.
Lay down your substrate and set up your hardscape as desired.
-
Important: Before planting, mist your substrate until it is thoroughly and visibly damp all the way through, but not flooded. Too much water can cause mold to form which can result in the rotting of your plants. Most substrates will darken in color when wet. Also, make sure that you do not leave any pools of water. Simply siphon out any excess water if necessary.
Then, prep and plant your plants. Once finished, use clear saran plastic wrap to tightly cover your tank in order to trap in humidity and prevent your plants from drying out. The plastic wrap will stay covering your tank for the duration of the DSM. This process creates an environment like the riparian habitats that most of our aquarium plants come from.
Part 2:
Maintenance of Your Dry Start Tank
During your dry start, plan to have your light fixture on for at 10-14 hours a day. 12 hours of light is that sweet spot.
You will most likely need to mist 2-3 times a day to keep soil moist. You can also mist based on how your soil looks. Is it beginning to dry up? Make sure to keep your substrate thoroughly wet, but remember to avoid the pooling of water and siphon out any excess.
Keep in mind: The higher the humidity, the easier your plants will transition to submerged growth once you flood your planted aquarium. If the tank is misted infrequently and the plastic wrap isn’t covering tightly enough, then the humidity won’t be high enough. Too little humidity will cause the plant to grow a thicker cuticle (the waxy covering that helps the plant retain water). For a dry start, the plants will need to maintain a thinner cuticle because it will allow them to facilitate the transportation of water and carbon dioxide once submerged.
In the photos below, you can see that I was able to mist often enough and my Pearlweed was tricked into growing as it would underwater, showing a translucent, light-green coloration as opposed to the more solid color of its emersed form. Referring back to my point on plant cuticles, the solid green of pearlweed’s emersed form is because of a thicker cuticle, while the see-through green of submerged pearlweed is due to a thinner one.
Part 3:
Flood Your Tank
How long should you wait before flooding your tank? This depends on your judgement! 4-6 weeks is the average amount of time it takes for your plants roots to establish themselves in the substrate. Although, some aquascapers will keep their dry start going for a couple of months until a lush, full carpet has spread in their tank. The main point of a DSM is so once your plants have rooted and begun to spread, then it's time to flood the tank!
Before flooding, don't forget to add the rest of the desired plants to your scape. This includes those epiphytes & large stem plants I said to hold off on!
Now is the time to equip your tank with a filter and some CO2 gear as well.
Now that you understand the process of setting up and maintaining your DSM, here are some tips to make sure your dry start is a success:
Dry Start Method Tips for Sucess
-
Dry start with wisdom. If you’re receiving plants that are already completely adapted to submerged conditions, I recommend not going through with a dry start because the plants would need to transition from submerged growth, to emersed, and back again.
-
Wait to add your epiphytes & large stem plants. Bucephalandra, Anubias, or Ferns, etc. should be added after flooding. The Dry Start Method is meant to help your carpet plants (or other plants that will be planted directly in substrate) quickly spread and establish themselves before flooding your tank.
-
Mist as much as possible! Even better if you already have an automated misting system. Don’t let your plants dry out. It’s best to use RO water or water that has already been dechlorinated.
-
Create a small spot with no substrate towards the front of the tank. This is where you’ll siphon out excess water. Do not let water build up past the substrate level because doing so may cause algae to start growing.
-
It’s good to air out the tank once a day to prevent mold. Simply lift up the plastic wrap while you mist and let the tank breathe for about 20-30 minutes a day. Doing so helps prevent mold and gives the plants some fresh air! Proper CO2 exchange is necessary for your plants to grow. Make sure to limit breathing time to 30 minutes to avoid drying out your plants. If mold does pop up, simply take a wet paper towel and wipe it off and/or remove the decaying leaves.
-
This is your opportunity to blast your tank with light! During my dry start, I would even leave the lights on for over 12 hours a day. After your planted tank is flooded, no more than 6-8 hours a day is recommended depending on the type of plants in your tank.
-
If you want to immediately stock your filled tank with fish or shrimp, start cycling your filter media on another tank or container when you begin your dry start. Then, when you’re ready to fill your tank, simply switch over the established filter media and you can immediately fill and stock your tank with your fish and shrimp friends! Do keep in mind that it’s always best to slowly add your livestock in increments to let the appropriate levels of beneficial bacteria to grow. Learn more about cycling your tank properly by clicking here.
- If you aren’t planning to inject CO2 after you fill/flood the tank, then expect some melting as the plants adapt to an environment with less CO2. This is normal and your plants should be able to bounce back in their new environment after the minor melting.
Remember that a dry start can go on for as long as you’d like, but in my experience, I prefer to fill the tank after all of the plants have visible roots and new leaves. Once your aquarium is flooded, simply treat it as you normally would!
Below are photos showing the progression of my most recent aquascape, The Green Gorge:

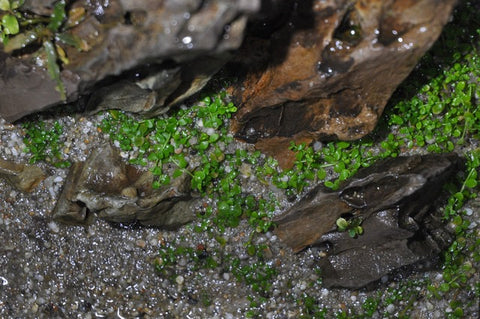
Above is Week 1 after planting. Plant list: Monte Carlo in the foreground, Pearlweed and Echinodorus Tenellus in the midground, and Eleocharis Montevidensis in the background.
I’m sure you have noticed that I used sand instead of controsoil. You will see quicker, fuller growth if you use controsoil.
Keep in mind that if your aquascape has a large slope, you will most likely get pooling at the lowest point. The water level was a bit too high, so I immediately siphoned it out after the photo. Try not to let the water pool for too long in order to prevent algae.

Here we are at Week 2! It’s hard to tell if the Monte Carlo in the foreground has grown much, but you can clearly tell that the Eleocharis has begun to establish itself.

This is during week 3. The Monte Carlo has settled in by now and has grown compared to the last two pictures! I’ve also added a glass turtle and shark for the hell of it. They don’t do much growing but they help me pretend like there’s activity in the tank.

This photo is the day before flooding after week 4! It may not seem like the Pearlweed grew much, but I had already trimmed it twice before this picture was taken. In hindsight, I should’ve taken photos before maintenance to show the speed at which Pearlweed grew. I’m sure if I used a controsoil, then I would’ve gotten a quicker and fuller growth of all plants.
Below are a series of progression photos from week 1 to 4 highlighting the growth of Monte Carlo in one specific spot.


Tell us - Was this article helpful? Please leave a comment below!
If you have any questions regarding this article, please DM us on Instagram, Facebook, or email support@buceplant.com so we can assist you - @buceplant
Comments
Leave a comment